Sunday, August 24, 2014

"Can you make me some post-apocalyptic clothing?"

My boyfriend asked me if I could buy or make him some new clothes. I pointed out how this will result in him wearing strange clothing I want to see him in, but okay!

I was going to use this interesting double layered cut up fabric for a dress, but it's a bit sheer. One day I got the idea to make a shirt for him. Sweet, I get a use for the fabric and he gets something vaguely post-apocalyptic.


This is only the third thing I've made on my serger after not having used it for a couple years, so it's not perfect (it didn't help that the fabric was inherently difficult to work with). The biggest problem is that the back of the neckline got a bit stretched out. It's not too bad, but enough to bother me.


It's kind of interesting that the inside of this looks like flowers and leaves because of how the outside layer is tacked onto the fabric. It's such a contrast to the outside.

Like I mentioned in my previous post about using this machine, I like having different colored threads in the stitching instead of four spools of all one color. In this case, I used one golden brown and the rest black to match the fabric.


I didn't use a pattern. Instead, I traced around a t-shirt onto the fabric, basted it on a regular machine, had him try it on and made adjustments. Once I had the fit right I serged everything so I didn't have to worry about him stretching the shirt and busting any seams. I finished all the hems with the serger too for a rougher look.

Saturday, August 23, 2014

How are my calves too big for everything?

Every once in a while, I'll find a pair of skinny jeans or pants that I really like and convince myself that they'll totally fit. They pretty much never do because of my calves. I guess no one expects my size waist/hips to actually have thighs and calf muscles.

I received the leggings pattern from So Sew Easy as one of my prizes for winning their "Make it Yours Contest" with my fox clutch. Okay. They're leggings. I've made leggings before, and they fit well enough. I used a self drafted pattern that had 4 pieces, so I wanted to try out this one because it's only 2 (one per leg). It looks like it fits very well for only having two pieces, and it's so much less work.

I also wanted to start using my serger more. It's been sitting in a box for years because I don't really have the space for it or the patience to thread it. But what the hell, I'm going to try using it when appropriate. My sewing table is only big enough for one machine so I literally switch between having the regular machine or serger on the table and the other unusable on the floor. It's kind of annoying, but doable.

This pattern seemed like a great choice for getting the serger working. It's simple, stretchy, and quick to put together. I also had some appropriate fabric conveniently on hand. I bought it because I liked the color and it was so very cheap, but had no plans for what to do with it.

I chose the size and cut out the pattern according to the instruction (woah, what? who am I?), thinking mostly that "hey, this fabric is super stretchy. It'll fit even if my calves are bigger than usual." Ahem. I should know better.

I made one pair of these, tried them on, and well... Good thing I have a friend who is about my size. I had wanted to make her some leggings as a gift anyways so I finished these up. She says they fit, phew.

I made a second pair, adding about an inch to the calves. They're still a little too snug in places but not uncomfortable.


I used the serger for all the seams and the bottom hems, though I had to get the other machine for the waistband.


You might notice I didn't use serger thread of all one color. For those who don't know, sergers use 4 spools of thread (or 3 depending on the stitch). I don't really have enough spools in a single color so I decided to do multicolored stitching. I actually really like it. I'll probably do this a lot.

Thursday, August 21, 2014

"This looks like some kind of bacteria in a petri dish... and these are clearly pigs"

I see a lot of hippie wrap skirts in photos from music festivals and other such things, and they seem both cute and functional. They also look like a fairly easy project. Come on, wrap skirt? It doesn't even have to be an exact size!

I do my own tie-dying sometimes, so I feel like I'm cheating a bit here, but I used some cool batik fabric remnants I bought. The prints on them are flowers and bears (or bacteria and pigs if you ask one of my friends).


Saturday, August 9, 2014

I've decided to start doing tutorials. First up: wtf are culottes anyways?

I mean, this is a tutorial for culottes? a skort? A split-skirt. That's probably most accurate.

According to internet sources (aka Wikipedia) culottes are any women's garment that looks like a skirt but is pants. They used to be a men's garment kind of like knickerbockers. (I just wanted to use the word knickerbockers.) It seems much more accurate to call the women's version a split skirt.

Someone linked me to a pattern for some culottes made to look like a circle skirt a while ago, but I can't justify buying a pattern for something I can easily do, even if I rarely have the motivation to draft these things. I convinced myself this time around by deciding to do a tutorial as I went along, and here it is!


Thursday, August 7, 2014

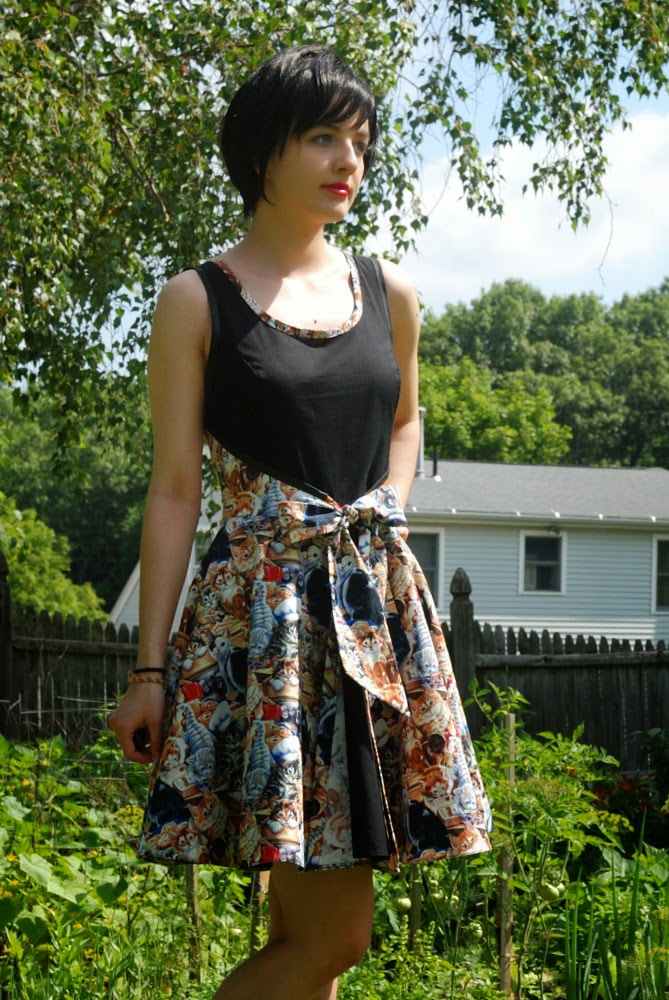
I don't think these kitties are qualified to bake muffins

A couple weeks ago I saw this awesome fabric of kitties baking muffins and promptly bought five yards of it. Did I have any idea what I would do with it? Of course not. But kitties! Baking!

(I'm really bad at only buying fabric I need. I'm fully out of storage space at this point. I have to stop. I keep telling myself I won't buy any more but then things like this show up and I can't help myself).

I knew I wanted to make a dress, but wasn't sure what style. Since I had a lot of the fabric, I decided on the retro whirl-away dress, as seen in a bunch of reprint patterns. Here are two current ones:

Butterick B4790
Vogue V8788

I have the Butterick pattern. This was one of the first serious sewing projects I ever did (back in 2009) and of course it came out pretty horrible. The pattern is very ill-fitting in the bodice portion and fixing it was far beyond my skill set at the time. Even now, I wasn't willing to take on the job. Sometimes things just aren't worth figuring out.

Instead, I pulled out my sloper and altered that into the wrap-around style of these dresses. It went way better than I expected. Of course there could be some improvements, but hey, it worked! There's more info about using a sloper later in the post, but first the finished dress:


I'm wearing it with the pink organza petticoat I made a couple weeks ago. It's exactly the amount of poof I like. In the one photo below, you can see it without any petticoat. It's a bit more casual.

Thursday, July 31, 2014

Bias binding is serious stuff.

I'm sure I've read instructions for bias binding at some point, but between then and now I started doing it the other way around. Let me explain. A lot of instructions tell you to sew the binding to the right side of the item you're binding, flip it to the inside and pin, then top-stitch from the front hoping to catch the edge in the back. This tutorial explains it in a lot of detail. I did binding like this for a while because that's what binding and patterns I had told me to do.

This method seems illogical. I can't see the back that I'm trying to catch a tiny bit of, and the front is already sewn on... why top-stitch from the side that's perfectly attached? I haven't seen a good explanation for why the first method is better. I'm curious about why the second method isn't standard.

In all fairness, my search for "bias binding sewing tutorial" did turn up some that sew it on the way I do. This tutorial was the top hit. The idea is to sew it to the inside first, flip to the front, and top-stitch without worrying about catching the edge you can't see.

If you just want a quick explanation, here you go:


Sew your binding in the fold, with the right side to the wrong side of the fabric you're sewing it to. I stretch the binding slightly as I sew it to things like necklines and armholes so it doesn't gape.


Fold the binding over to the front so it just covers the previous stitching line. Top stitch.


That's it, way fewer steps than the other method. The ends are finished as with any binding - with one folded under so the raw edge is hidden and sewn overlapping the starting end. As you can see, with this method the outside is neatly stitched and the inside doesn't have any missed spots where the binding isn't attached. This is also a peek at a dress I recently finished. The fabric has kittens making muffins! What? More about that in the next post.

"It's for when you want to look like you're wearing a sweater without being hot"

Pretty much.

I bought this fabric a couple months ago because it's so amazingly soft and light. I didn't know what I would use it for, but then I won some patterns from So Sew Easy. One of the patterns I picked is for the Slouchy Sweater. I really liked the shape at the side and how it flows into the sleeves. It looked flattering and comfortable.


You can see the seams are a little wavy. I did french seams on the top because this fabric runs like crazy. It pretty much falls apart when you cut it because of the loose knit and silkiness of the fiber. The downside is that the seams are bulky this way.


Thursday, July 17, 2014

Videogames? Videogames.

The past couple years there has been a Mario (the game) themed event in my area. I made the skirt I wore last time out of red pvc, but it's kind of annoying to wear so I wanted to do something different. I don't wear red much lately because of my hair color, but I did want to use this shirt because it's the only one I have that fits the theme. The colors in the shirt were limited, and I didn't want to buy new fabric for a one-time outfit, so... well... red pvc. I've reached the end of it, which is why there's some white added in.


It's a simple circle skirt, unhemmed, with a spandex waistband zigzagged on to preserve stretch. As usual, there's also some elastic in the waist for a little extra support. Sewing the waistband on was pretty horrible because I didn't need to stretch the spandex much. Since it wasn't stretched yet, it kept stretching out of shape and pulling/bunching while I was sewing it. In the future, I think I'll cut spandex waistbands smaller (which I usually do) so I have to stretch it to fit the rest of the skirt and prevent the bunching. I could have re-done this, but... It'll be dark at the event. It's fine.


I don't know why I didn't mention this shirt last time I posted it, so I will now. I bought a little kids' shirt and cut off the collar and arm binding because those were much too tight. I thought I would have to do more work than that but without the bindings it fit fine.


Laid out, the skirt looks kind of like a pokeball (woo, multipurpose). You can see how the panels are placed here. This was the best arrangement to maximize use of what I had of the red without having a ton of panels. In the end, I really like how it came out with the white.

Thursday, July 10, 2014

As-I-Sew, now with more pink fluff monsters!

A long, long time ago, when I was super into looking at lolita clothes, I bought several yards of pink organza to sew my own petticoat. I sewed some easier petticoats and bought others, thus the pink organza sat around in a box.

The last time I went to put on one of my shorter petticoats I noticed it wasn't giving me much poof at all. Upon closer inspection I found the tulle was a lot less stiff and crunchy than I remembered it. It's probably spent too much time crushed in the closet (how in the world am I supposed to store the half dozen or more petticoats I have? They need their own room).

This old petticoat would not do (side note: it was the first I ever made), so I pulled out that pile of pink organza. Organza petticoats are a lot harder to kill than tulle, though more work due to all the layers and fabric needed to get them fluffy. I hoped this wouldn't be too difficult since I have a ruffler foot, but man was I wrong on that one.

On ruffler feet and organza:
Organza shreds like it's its job.
Rufflers grip the edges of fabric, tearing into it with their little robot teeth.
Rufflers look like little smiling robots.

The experience quickly became a nightmare of getting organza caught in the ruffler and ripping out thread nests.

Alright then.
I didn't really know what I was doing, so the order in which I sewed everything could have been better. After sewing the two layers I made together I thought the petticoat still wasn't fluffy enough and added an extra ruffle close to the top of the bottom layer. This was kind of a hassle to add at that point because all the fluff gets in the way. Do not recommend.


The finished petticoat is two layers: A bottom layer that is three tiers and one extra ruffle sewn flat onto it, and a top layer that is two tiers (also fuller than the bottom one). All the ruffles are sewn together once with a straight stitch, zig-zagged on the edge, then sewn down flat in a "mock flat felled" finish. The vertical seams are french finished.


The petticoat  has a spandex drawstring waistband to avoid scratchy chiffon pressing into my waist, and to make size adjustment easier. The spandex on it's own was not strong enough to hold this up.


This is what the petticoat looks like worn normally on it's own and under one of my heavier skirts (the first cupcake skirt).


Because the bottom layer is smaller, it kind of squishes down some of the fluff when the petticoat is inside out and gives a slightly different shape.


Just for comparison, here's the skirt on it's own.


If you'd like to make your own petticoat, here's a sort of mini tutorial. This petti is 18" long and all the measurements include a half inch seam allowance. I have a 28" waist, for reference.

When I started, I wanted to do three tiers of gathering per layer of petticoat. My tiers weren't wide enough, so I'm giving you measurements for ones that would be. I switched to two tiers on the second layer because the three seemed unnecessary. This goes together like any "tiered skirt," which there is lots of tutorials for out there. The info here is mostly for figuring out the measurements.

Three tiered petticoat
  • top tier 9" by 2*fabric width
  • middle tier 7" by 3*fabric width
  • bottom tier 5" by 4*fabric width
Two tiered petticoat
  • top tier  8" by 2*fabric width
  • bottom tier 12" by 4* fabric width
I suggest doing either two or three layers of organza.