Showing posts with label dress. Show all posts

Monday, August 17, 2015

Helllooo sailor!

I haven't been sewing or blogging much at all lately. I finished the following dress back in January, and am just getting around to posting it now! To add to that, I had the fabric put aside for it for like eight years...

I got a bunch of navy polka dot fabric from my mom and wanted to use it for something special. I think it's just a plain woven cotton (no stretch). I decided to make a dress inspired by this one from Angelic Pretty:

(Not my photo - I found it online a long time ago)
Here's my version:


I didn't realize until after I took the photos that my scarf was ridiculously long. Oops.


Monday, March 16, 2015

I had a sudden urge to make a tutorial, so here's a quick guide for a comfy summer dress

A couple weeks ago, someone on Reddit's sewing sub asked about making this dress, which is available from Threadsence:

Photo doesn't belong to me - it's from the Threadsence site
(Here's the original discussion for the curious)

This dress seems crazy simple to make, and (full disclosure) I haven't made it but drew up this guide for how I would go about sewing something similar. It's also some insight into how I figure out how to make something in my head/on paper before actually doing it.

Thursday, December 18, 2014

Vertical stripes > horizontal stripes

After I made the catsuit in my last post, I had a bunch of leftover striped fabric. I combined that with some leftover black spandex from this project to make a quick color-blocked dress. The whole thing is serged together, and I used my standard fitted knit dress pattern. (You can find the tutorial for it here).

You'll notice a strange collar in the photos as well. I saw some cool collars and other accessories made out of boning a couple weeks ago and wanted to give it a shot. More on that later.

Back to the dress: To figure out the color-blocking, I traced my plain dress pattern and eyeballed a line where I wanted the center panel to be. It follows the curves of the side seams on the dress, but slightly exaggerated. I cut on the line and made a note to add seam allowance on the new edges.


Wednesday, November 12, 2014

I'm not sure what to call this - A dress? Overalls?

Back in August, a Reddit user was giving away a couple vintage patterns and I snagged this baby:


It's Le-Roy/Weldons number 9135, which is a brand I've never even heard of. I love the overall bib type top - it looks a lot like the backless dresses that were super popular this summer. I wanted a skirt that was a bit fancier, and had also recently acquired this Japanese sewing book (Otome no Sewing). It includes a pattern for a super cute gathered skirt with a yoke.


I then found this great flannel at the $1.99 fabric store. Put all that together, throw in some lace, and here's the result!


I had to get someone to help me fit the back because trying to do it myself when there's so little fabric was quite difficult.

Saturday, November 8, 2014

There's some cool stuff at "clothes by the pound"

If you have a "clothes by the pound" store near you and want to practice sewing, go there! In about twenty minutes, I found these two great pieces that were in pretty rough shape, but didn't have any stains or holes in the body of the fabric (this is important - things with popped seams, ragged hems, ripped sleeves are all good candidates for fixing, things with big mystery stains and holes in the center of a panel are not). With a couple hours of work, I have some awesome new dresses that I would have struggled to put together from scratch. I wouldn't normally post about "fixing" clothes, but I also thought these dresses were really awesome designs.


Saturday, September 27, 2014

I could go for a taco right about now.

A couple months ago, some of my friends came to me and asked if I would make them into a taco for Halloween. Well, that's an opportunity that's hard to pass up! (They get super bonus points for asking far enough in advance). I think this is a super cute couple's costume. Sam here is playing our taco shell/tortilla, and Eloise is the lovely bunch of fillings.


For the shell, I cut a large circle of 1/2" upholstery foam (technically two half circles I had to sew together because I couldn't get a piece large enough) and made a cover for it out of fabric that has sort of a speckled yellow/orange pattern. I added loops for the shoulders, hands, and legs so it doesn't flap around behind him. In retrospect, it could have been a bit bigger. I was too concerned with making it hard to move around and sit. Sam found a perfect yellow shirt to go with it, and I can only assume he already had these gold pants.


For the dress, Eloise gave me a simple black dress that fit her well to use as a base. I sewed fleece shapes over that to simulate the layers of fillings that would go in the taco. A bit more on that later.


I got really excited to make this little hat for some reason. It's a small foam base covered with brown fleece (for meat) with other fillings sewn over that. The whole thing is sewn to a headband. 


Tuesday, September 23, 2014

Holy hell I actually finished the Victorian project.

Alright! So, earlier this year I was hired to do some art for a card game, Moriarty's Machinations. Part of my involvement with the game was dressing up in character as Irene Adler to advertise at a couple conventions, including the Boston Festival of Indie Games. (We won the award for best indie tabletop game by the way, which was super exciting!)

It has been a long time since I posted about my Victorian costume. Check out the project's tag for all the related posts. I started it back in 2011, as an independent study course in college, and then didn't finish it after the class was done. There was only a couple things left to do by the time I got this job that required me to have a period costume, so it finally motivated me to finish.


Here's my original rendering. I think I got pretty close.


The fabric isn't authentic at all. I used a striped velveteen synthetic (it feels luxurious at least) and a heavy plum sateen (probably poly). I also didn't stick very closely to one part of the Victorian Era. The anachronisms aren't so strong that a casual observer would notice them.


Monday, September 15, 2014

Guest post at So-Sew-Easy

If you go back a couple months, you'll remember I won the So Sew Easy Make It Yours Contest with my fox bag. One of the prizes was to write a guest post for the So Sew Easy blog. That post is now up!

It's a tutorial for a simple knit dress, like so:


Hope you like it!

Thursday, August 7, 2014

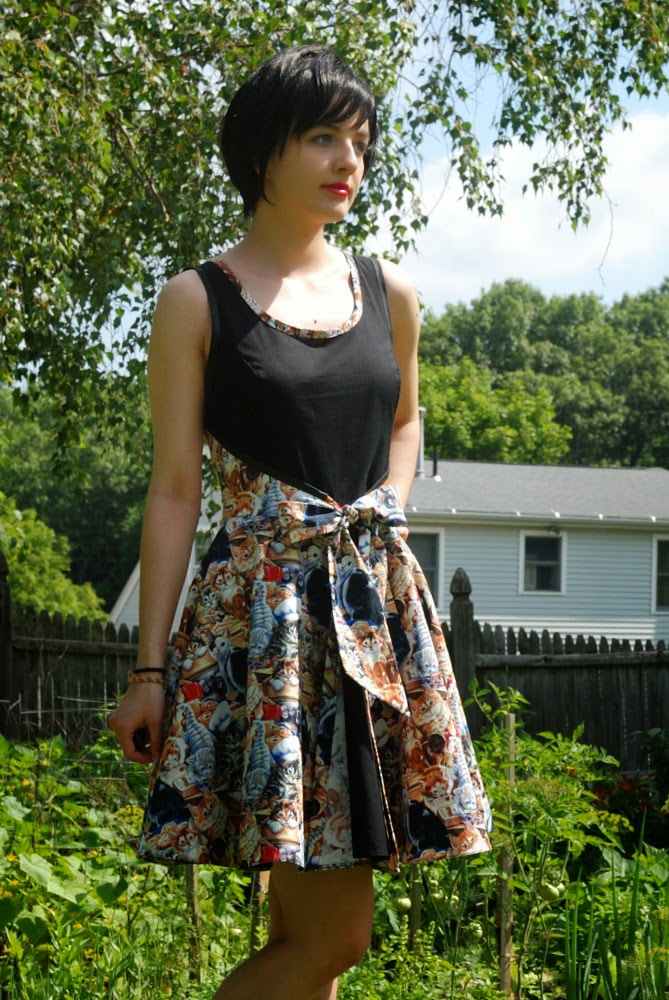
I don't think these kitties are qualified to bake muffins

A couple weeks ago I saw this awesome fabric of kitties baking muffins and promptly bought five yards of it. Did I have any idea what I would do with it? Of course not. But kitties! Baking!

(I'm really bad at only buying fabric I need. I'm fully out of storage space at this point. I have to stop. I keep telling myself I won't buy any more but then things like this show up and I can't help myself).

I knew I wanted to make a dress, but wasn't sure what style. Since I had a lot of the fabric, I decided on the retro whirl-away dress, as seen in a bunch of reprint patterns. Here are two current ones:

Butterick B4790
Vogue V8788

I have the Butterick pattern. This was one of the first serious sewing projects I ever did (back in 2009) and of course it came out pretty horrible. The pattern is very ill-fitting in the bodice portion and fixing it was far beyond my skill set at the time. Even now, I wasn't willing to take on the job. Sometimes things just aren't worth figuring out.

Instead, I pulled out my sloper and altered that into the wrap-around style of these dresses. It went way better than I expected. Of course there could be some improvements, but hey, it worked! There's more info about using a sloper later in the post, but first the finished dress:


I'm wearing it with the pink organza petticoat I made a couple weeks ago. It's exactly the amount of poof I like. In the one photo below, you can see it without any petticoat. It's a bit more casual.

Thursday, July 31, 2014

Bias binding is serious stuff.

I'm sure I've read instructions for bias binding at some point, but between then and now I started doing it the other way around. Let me explain. A lot of instructions tell you to sew the binding to the right side of the item you're binding, flip it to the inside and pin, then top-stitch from the front hoping to catch the edge in the back. This tutorial explains it in a lot of detail. I did binding like this for a while because that's what binding and patterns I had told me to do.

This method seems illogical. I can't see the back that I'm trying to catch a tiny bit of, and the front is already sewn on... why top-stitch from the side that's perfectly attached? I haven't seen a good explanation for why the first method is better. I'm curious about why the second method isn't standard.

In all fairness, my search for "bias binding sewing tutorial" did turn up some that sew it on the way I do. This tutorial was the top hit. The idea is to sew it to the inside first, flip to the front, and top-stitch without worrying about catching the edge you can't see.

If you just want a quick explanation, here you go:


Sew your binding in the fold, with the right side to the wrong side of the fabric you're sewing it to. I stretch the binding slightly as I sew it to things like necklines and armholes so it doesn't gape.


Fold the binding over to the front so it just covers the previous stitching line. Top stitch.


That's it, way fewer steps than the other method. The ends are finished as with any binding - with one folded under so the raw edge is hidden and sewn overlapping the starting end. As you can see, with this method the outside is neatly stitched and the inside doesn't have any missed spots where the binding isn't attached. This is also a peek at a dress I recently finished. The fabric has kittens making muffins! What? More about that in the next post.

Wednesday, July 9, 2014

Yay! 100 posts! Now with foxy updates. Ohh ~

I don't actually have anything special for this... so let me update you on some things that are going on around here.

Specifically, you might recall, a couple months ago I entered a fox bag into a sewing contest over at the So Sew Easy blog. Well, I won! I don't know why I didn't post about this earlier, I've known for over a week now. Thank you to Deby for holding the contest, the sponsors for all the wonderful prizes, and of course all of you who voted!

One of the prizes I want to talk about is writing a guest post for the So Sew Easy blog. I've considered this a lot because I think our audiences probably don't overlap much. My clothes are pretty out there compared to Deby's if you just glance at them. Some of the basic shapes are similar though, and techniques don't vary too widely no matter what you're sewing. After some input from Deby I've decided on a tutorial for a knit fabric dress, like the rainbow dress or Alice in Wonderland one. Even though these two dresses look pretty different, they are mostly the same pattern/construction. It's a pretty simple design that can be adapted for many different dresses.

The other prize of interest to more than just myself is a collaboration with Deby on a bag pattern. I'm pretty excited about this because I don't typically make purses (well, I make travel bags for work, but that's more like factory production than personal sewing). We've started brainstorming ideas. There's so many possibilities! I hope I'm not too much trouble.

Finally, I am planning on making some fox purses for sale. If you're interested, let me know! I've been overwhelmingly busy somehow the past couple weeks and will be the next few weeks too, but someday soon I'll get some time together from the aether to make a couple and list them in the shop. Are there other animals you'd be interested in? I'll probably do a cat for obvious reasons, but there's so many cute animals out there!


If you've read this far, thanks! Remember to keep an eye out for  all these things coming up!

Wednesday, May 7, 2014

Remember how I was looking for newsprint fabric?

I mean, you probably don't, and I still haven't found any... but! I did get a bunch of these t-shirts recently that have classic books printed on them!


I need to think of other projects to do with them since I have so many, but my first though was to make a dress with some of that shiny, leather-looking spandex as a skirt. I copied the bodice shape from the dress I always use for knit fabric sleeveless pieces, as seen here. The skirt is just a regular circle skirt, which isn't even hemmed because this spandex is awesome and doesn't fray or run.


I quite like how it looks with this wide belt. The skirt is a little heavy for the t-shirt knit top, so it keeps it up a bit better.


Here is what this looks like with a small petticoat:


The back of the shirts has a corresponding print. I had to take my bra off for this photo because it causes some obvious bunching in the back. This is a bit unfortunate because I need it in the front to keep the bodice from being see-through. I also cut my hair somewhere in between taking all these photos.


I made binding out of the spandex for the top, along with a bow (Whaaat? Yea I actually made a bow in a timely manner). There's some twisting in the binding but it's not as obvious when the dress is worn as it is when it's laying flat or hanging.


I don't think I even really want newsprint fabric anymore. After working with this, I realize I don't want more black and white. Perhaps I will switch my sights to comic strip fabric so I can use some more color.

PS. This is available in my Etsy shop

Wednesday, April 30, 2014

It seems like I'm on a bit of a spandex kick

One of my friends recently asked me to make her a little party dress out of this cool, shiny black and silver spandex. I was kind of worried about how it was coming out while working on it because my machine was not doing well with the stickiness of the fabric, but I'm pretty happy with the way it looks when it's worn.

I didn't use a pattern for this. Instead, I traced a top and dress my friend owned for the bodice, and made some layers of circle skirts for the bottom. At first it was only going to have one black and one silver layer, but it came out a bit short so we added one more black layer.


These stripes on the sides gave me the most trouble. They stretched out a lot when I was sewing them to the black layer. This fabric irons well enough though (for something that looks like it would melt instantly) and I got them to lay a little better with strategic ironing. Pretty much everything is zig-zag stitched to preserve the stretch of the fabric, including these applique stripes.

The fabric is relatively heavy and has a lot of bounce to it. This makes the skirt move really well when dancing; I was pleasantly surprised how nice the different layers looked.

Thursday, April 10, 2014

Super space dress three million

For the past couple weeks I've been strangely determined to find galaxy print fabric. There's a lot of galaxy print stuff floating around these days, and it's always caught my attention. I don't really care about trendy things for the most part, but eh... this is pretty cool.

Anyways, I spent a while looking for a woven cotton with galaxy print that pleased me and didn't cost a bajillion dollars. This apparently doesn't exist. Then one day I got home to a package waiting for me... did I order something and forget about it? It's happened before, but not this time. Turns out my friend Bria gifted me with some awesome galaxy print fabric! It's a knit not woven, but heavy enough that it acts more like a woven would (for example, I had to use princess seams because it wasn't stretchy/form fitting enough when cut flat like for a typical knit dress).


I was so excited to make a dress that I just kind of started cutting, so there's some things wrong with the final product that could have easily been avoided. The hem is a touch shorter than I wanted (I cut it expecting not to fold a hem under, but then I did), and the waist is a bit too high. When I cut the front pieces using a pattern I had around (I think it was from McCalls, but I don't remember which one), I had to reduce the width of the pieces by the seam allowance. Somehow this caused the side front pieces to be much shorter than the center front piece, and when I evened them out the waist became too high. Not much I could do though without re-cutting and this fabric was too precious for such things. Other than that, the bodice fits quite well.


For the back, I used this netting I recently picked up (also in navy and yellow... I had no plan for any of them at the time). Netting like this is one of the worst things to sew. It's literally holes. There's so little fabric for other things to attach to. I figured I'd bind all the edges, but it's super hard to tell how much to stretch the netting while binding for it to lay flat when on a person. The binding also didn't play well with the knit, so I ended up cutting it off the front and just rolling those hems.


Here you can see my poor attempt at binding. The back neckline sticks out a bit (some more ironing might fix this, maybe), and there is some ugly joining at the shoulders. It's not overly visible since my hair typically covers this part anyways. 


Because of the lack of structural integrity in the netting, I also bound the back waistline seam and added some elastic for extra support. I used french seams on the sides and shoulders for similar reasons.


In conclusion, yay space dress!