Wednesday, September 25, 2013

Some unicorns may have been harmed in the making of this project.

Some suggested listening:


There isn't too much to say about this project as it's something I've made a couple times before. Here is a similar project I previously posted.

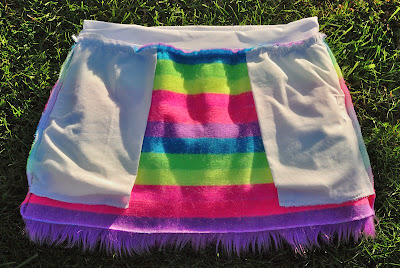
I'm doing a post anyways because I really like this fur. It's so soft, and so colorful, and blacklight reactive. It feels like I'm wearing unicorn pelts. I made fluffies/ leg warmers/ what have you out of it a couple months ago, then this week got myself together and made the matching skirt.

The bands on all the pieces are white spandex. I add elastic or drawstring anyways when I do bands like this because the bands tend not to say up perfectly on their own while dancing. Nothing really stays in place when I dance... which is to say I dance really hard. Less energetic clothes wearers probably wouldn't have this problem as the spandex is pretty stretchy on it's own and can stand up as elastic.


This is what the inside looks like. It's really just a super short slightly a-line shape, with a sewn on waistband. The fur can be difficult to sew, but the pattern itself definitely isn't. You can see I also added pockets, because girls' party clothes desperately lack and need them. I don't know where to put my stuff in any of my store-bought going-out skirts. These pockets close with velcro. I originally made the skirt a little too long and had to shorten it after putting everything together, so I hope the pockets don't stick out when loaded up. I did tack them in place, so that will hopefully help avoid the problem.

Sewing machines are too loud.

This post is a little different than my usual ones. I just want to rant a little about how loud sewing machines are.

I like sewing when I visit my boyfriend because there is less distractions than if I am in my room. Unfortunately I don't have a separate space to sew at his place and my sewing machine (1960s Kenmore) is crazy loud. It keeps him from getting work done. It bothers me too. I've noticed that when I sew at home (1990s Kenmore), my ears begin to hurt after a while. I wear earplugs sometimes, but then I can't watch tv or listen to music at the same time. Headphones are cool but get tangled up and also start hurting my head after a while because they press my eyeglasses into my temples.

I tried searching for solutions to make a machine quieter. All the suggestions are to get it serviced (why does servicing a machine cost $100? My machines didn't cost that much), oil it, and put it on a foam mat. I went as far as checking the sound levels of the machines with a decibel meter, placed on the table next to the machine. I realize this is checking very close to the source, but while I'm sewing, my head is pretty much on top of the source too. The 1960s machine got 97 decibels, and the 1990s machine 98. This is far too loud. Prolonged exposure to sound levels like this damages hearing. I already have the hearing of someone much older than me (don't go to concerts/raves without ear plugs kids!), I don't need it to get worse.

I know there are some machines that are quieter, sometimes, maybe. The ones I used in college were eerily quiet unless you were sewing full speed. That's great and all but I sew at full speed really often. People would give me strange looks in the school's costume shop when I'd go off, pedal pressed all the way to the floor. Still, perhaps they were somewhat quieter. The problem is that these were $1500 computerized machines. I don't want to spend so much on a machine that frustrates me constantly because it has a mind of it's own and too many ways to mess it up. If I take my foot off the pedal on a mechanical machine it'll stop instantly, none of this taking another stitch business, for example, or sewing at half the speed when in reverse.

Another option that someone has suggested is an industrial machine with a servo motor. I haven't had the chance to try one so I can't say how loud they are. I could use an industrial machine, but again they're a bit pricey. I guess that's worth it to save my hearing, but with these machines the other issue is portability... and where in the world do I put this tank of a machine?? I definitely can't lug it back and forth to my boyfriend's house.

One day, I went to a sewing machine store, decibel meter in hand, and asked to try out a bunch of their machines. Some seemed quieter than others, but all ended up about the same, ranging from 95 to 100 decibels. We tried some with and without foam mats underneath. The mat made a decibel or two difference. Perhaps the difference is more noticeable from further away. In any case, my $15 Kenmore, $100 Kenmore, and all these machines ranging from $200 to $1600 reached about the same volume at full speed.

I oiled my machine because it wasn't running as smoothly as usual, and I hoped it would help some with the sound. I am assuming error in measurement, but funny that it registered a decibel louder than when I measured before oiling.

I haven't found a solution. I don't know if there is one, short of covering the machine in soundproofing materials. It'll probably overheat.

I prefer to look like a rainbow fell on me.

As much as I promise myself I'll dress fancy, I still look for easy outfits more often than not. This leads to a need for simple dresses that don't wrinkle like it's their job, and that don't require 4 layers of underpinnings.

A few weeks ago I got a comfortable, super simple knit dress from H&M that still looks appealing to me. I'm not a big fan of sewing knits, but eh... (come on, self, this is so easy! You can totally make more of these!) I could easily fold up the dress and use it as a pattern.

My first idea was to make a super shiny top to wear out, but somehow, despite both the dress fabric and the fabric I had for the top being about the same level of stretch, the top came out much too small. It cut into my underarms and squished my chest. I didn't leave enough seam allowance to fix it. I thought I would just use the rest of the fabric to make a skirt (my default) but because I had cut the top out, there wasn't enough left. Ugh, okay. Next project.

I had some leftover knit fabric from when I made leggings a couple years ago. I grabbed one of those and figured I'd have just enough to make one of these dresses. Since the fabric was a 4-way stretch, I ended up cutting one dress panel with horizontal and one with vertical stripes. No pattern matching required! I'm really quite happy with how this dress came out, and the lack of problems making it. It all went together well the first time.


As you can see, I bound the edges with some bias strips of the fabric. If you stretch the binding as you sew it on, it pulls the dress (or tank top, t-shirt, whatever) edges nicely to your skin and keeps it from gaping. If I had to pick out a problem with this dress I'd say I wish the joints in the binding were smoother. The fabric is a little thick and having 5 layers of it in places made some obvious bumps. I doubt anyone will notice except me. 


Horizontal stripes where you need em', vertical stripes where you don't! Or wherever you feel like it. There isn't a front and back to this.

Friday, August 23, 2013

I have some kind of aversion to making bows...

...which is weird because I like bows a lot. It's quite a problem. Things sit unfinished because I don't feel like making any bows.

One of these things was the polka dot dress I started back in March 2012. Yea... a long time ago. I finished it a couple months after that, then it sat around in a pile on the floor because it needed bows. Cue sudden desire to finish things. I made those bows dammit!

I did do more work on the pattern as well since the original post, but honestly, it was so long ago I don't remember everything. You can see from the photos that I took in the center back at the waist, and also the sides at the bottom to give it a more wiggly silhouette.

Aw yes, look at those bows! They're all on pin-backs.

 I took this opportunity to play around with some hats, if you haven't noticed.

Here's the inside back, and outside front without bows. 

 I wish I'd made the swoop in the back hem higher up. Live and learn.

Bonus: Need your lawn aerated for free? Host a "high heels only" party. My thighs still hurt from re-distributing my weight during the photos to avoid sinking into the ground.

Can I be a crazy cat lady without owning any cats?

I'm a fan of Gertie's blog for better sewing, and saw her kitty cat dress a few months ago. I wanted, needed a kitty cat dress. Why didn't I have one already!?

Then I was looking for some thread for another project and ran into a cute kitty fabric. Score! I wasn't sure about using it for a garment at first, it's a bit too quilt-y looking on the bolt, but I went for it anyways.

I wanted to use the top from Butterick's B5603, but it just wasn't going to happen. I don't know what in the world to do to patterns to make them fit me without having to go through a thousand iterations of mockups. The top ended up being some odd combination of princess seam pattern pieces and drafting.


Look at this pattern matching. I am so happy I got everything to match up. There's some headless cats sure, but in the horizontal direction, no half cats, no two headed mutants, and they all line up across the pieces.


This dress made me question my sanity more than usual. It's pretty close to impossible to fit a back like this on yourself. The dress doesn't fit on my dressform at all, even at the smallest size, because of the shape of my upper chest/back and shoulders.

I had sewn the zipper in perfectly the first time (since when can I manage that?), put the dress on and... can't zip it. AH! it's too tight. I had to re-do the zip, and made every mistake in the book in the process. I sewed it with the top of one side on the skirt seam instead of the top at one point. How does that even happen?

 I used a bias binding on the arm holes and on the hem. Light colors don't look all that great on me, so I thought adding this would make it stand out from my skin-tone a bit more.There's also horsehair braid on the hem to give it some poof and help it hang in smooth waves, though I am wearing a petticoat in all the photos.


I also added pockets, albeit they are misplaced. They're too far center front because I didn't account for gathering correctly when I added them to the skirt panels (there's 5 panels total). Only the bodice is lined.

Like I said, I was a little iffy on the fabric being wearable at first. It took me a while to decide on the style of dress to make, but I'm pleased with how it turned out.

Ready to see one of the first skirts I ever made?

I was going through some of my closet the other day and found this sad looking skirt I never wore. It's one of the first skirts I ever made. I remember I dyed the fabric because I had leftover dye after doing some shirts (I'm even wearing one in the "after" photos). I also remember my mom helping me on the ruffle and some thread belt loops. I never wore the thing because the waistband just didn't fit right. It was my first time doing a partial elastic waist, and well, it was pretty obvious that I hadn't done this before.

Okay, here is the before, without a petticoat (I should have used one since I knew I would in the "after" photos, sorry).


I had tried to add some waist ties, but they were too long, so I tried to wrap them around the waist like a belt first, but that just looked lumpy, as you can see in the first photo.

I made this skirt right when I started learning about lolita. I think I knew even back then that it didn't fit the style, but was more "inspired by." It was kind of a test run for some fabric I had only a small quantity of, to see if it would be enough for a loli skirt. I believe the answer was "no" since I never made one out of that fabric.

Here's what it looks like now:


It's not that much different since I just re-did the waistband, but what's important is that now the waistband fits! I just did full elastic for simplicity's sake. This skirt isn't nice enough to be worth the effort of half elastic. At least now I might actually wear it, probably when I need to quickly throw something on since it's relatively casual compared to a lot of my other clothes.

I also turned the failed attached waist ties into a separate belt. There's thread loops holding it on. It's short enough to tie gracefully now, which I think makes the whole skirt work.

Sunday, August 18, 2013

Commission update: Naomi from Monsters University

I posted a while ago about some costume commissions. One of the customers got back to me with some photos! (I did not take these)


As the title states, the costume is for Naomi from Monsters U. I did end up having to make some alterations after she tried on the skirt I had made in my previous post, but it turned out well in the end and she was happy with it (yay!). I always worry things won't fit right when making items for people I can't see in person. Since my experience mostly comes from theatre, I'm used to having people try thing on while they're being made. In this case, I had interpreted the reference image differently than her and her husband and had made the skirt too A-line. Easily solved though!

Saturday, August 17, 2013

There I was, artery clamp in hand, holding fabric over a candle flame.

 This is a weird thing.


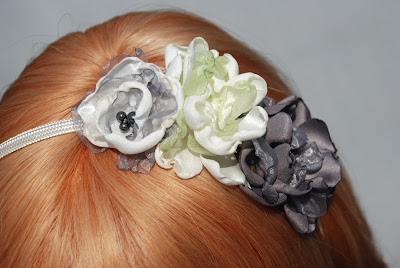
I used this video tutorial to make some fabric flowers to match a dress I bought recently. The process is, um, a little sketchy looking. I didn't have tweezers like in the video, so I improvised. Why do I have artery clamps but not long tweezers?


I also sewed my flowers instead of gluing them, though I did use hot glue to attach them to a headband and some clips. The headband is to match my dress, which is cream, gray, and green checkered/plaid/I'm not sure. There's pearls in all the centers just in case, but they're not all that visible most of the time. Here's how the flowers ended up:


PS. New wig! Always a fun time. This is the only one I have that is human hair. It creeps me out a little bit, but eh...

Wednesday, August 7, 2013

What animal has blue ears and white fur?

I don't actually know. I'm going with arctic fox... dyed blue >_>

Hey look! I made another hat!


I had a hell of a time getting the ears to not be super floppy because this fur is silky awesomeness which makes it not stay up very well. Some well placed hand stitches fixed the ears, though they like to sit towards the back like in the first photos. You can get them to point out to the sides if you fiddle with them a bit, but they'll pop back if you take the hat off. It's completely lined with fleece and the pockets at the ends can be flipped to either side.

I had originally gotten this pattern from a tutorial on craftster.org, but since then have edited it significantly. It's still not perfect, but it definitely gets the job done.